
In order to combat noise or graininess, I’ve experimented with various techniques and tools to minimize its impact on my photos. In this article, I’ll guide you through the factors contributing to noise and how to prevent it by optimizing camera settings, using proper lighting, and implementing stabilization techniques. Furthermore, we’ll explore post-processing methods to reduce graininess and improve the overall quality of your images.
So, join me on this journey to understand and tackle noise in photography, and together, let’s elevate our images to new heights of quality and artistic expression.
What is Noise in Photography?
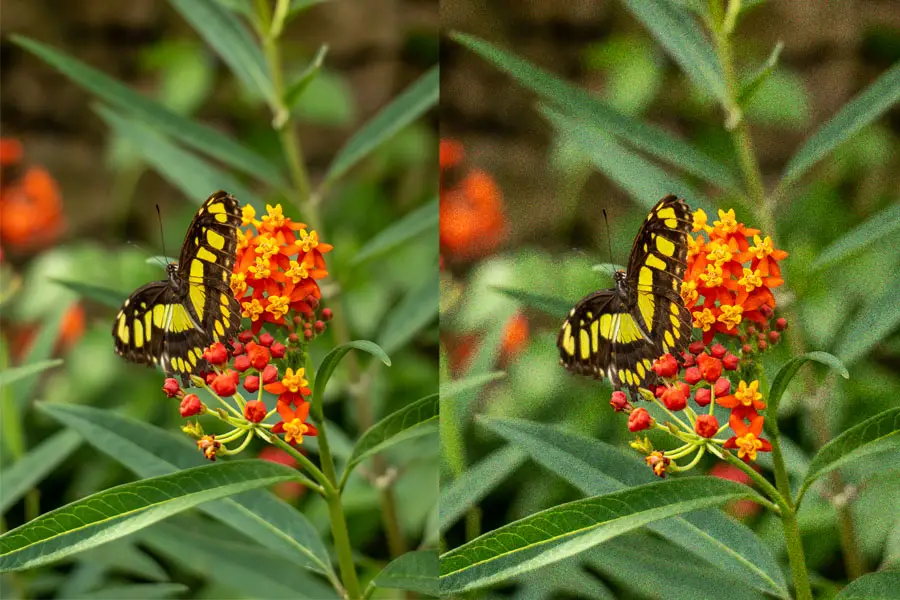
In photography, noise refers to the visual distortion or degradation of image quality, appearing as random specks, dots, or grainy patterns throughout the image. Noise can manifest in several forms, including luminance noise and color noise. The presence of noise can result in a loss of detail, sharpness, and color accuracy, ultimately affecting a photograph’s overall quality and aesthetic appeal.
Luminance noise appears as variations in brightness or lightness across an image, resembling a grainy texture. It is more prominent in darker, underexposed areas of the photograph, where the camera sensor struggles to accurately capture and interpret the limited light available. Luminance noise is generally considered less distracting than color noise, as it can sometimes resemble the grain of traditional film photography, giving images a somewhat organic or vintage appearance.
Color noise, on the other hand, presents itself as random specks or blotches of color throughout an image, often most visible in flat or uniform areas. It is caused by inconsistencies in the sensor’s ability to accurately interpret and reproduce the scene’s colors. Color noise can be particularly distracting and detracts from the overall quality of a photograph.
Noise in photography can be attributed to several factors, including the camera’s ISO settings, sensor size, low-light conditions, and image compression techniques. A better understanding of these factors and how they interact can help photographers make informed decisions when setting up their cameras and shooting conditions to minimize noise and capture high-quality images.
Causes of Noise in Images
Multiple factors can contribute to the presence of noise in images. Understanding these causes can help photographers make informed decisions to minimize graininess and capture higher-quality photographs.
High ISO settings
Increasing the ISO setting on your camera raises the sensor’s sensitivity to light, allowing for faster shutter speeds or smaller apertures in low-light situations. However, this heightened sensitivity amplifies the sensor’s signal, which can also increase the noise present in the resulting images.
Low-light conditions
Noise tends to be more prominent in low-light situations because the camera sensor struggles to accurately capture and interpret the limited light available. Insufficient light increases the likelihood of random variations in the sensor’s readings, resulting in visible graininess in the image.
Sensor size
The size of the camera’s sensor plays a role in the amount of noise present in an image. Smaller sensors have less surface area to capture light, making them more susceptible to noise compared to larger sensors. Cameras with larger sensors, such as full-frame or medium-format cameras, generally produce cleaner images with less graininess, especially in low-light conditions.
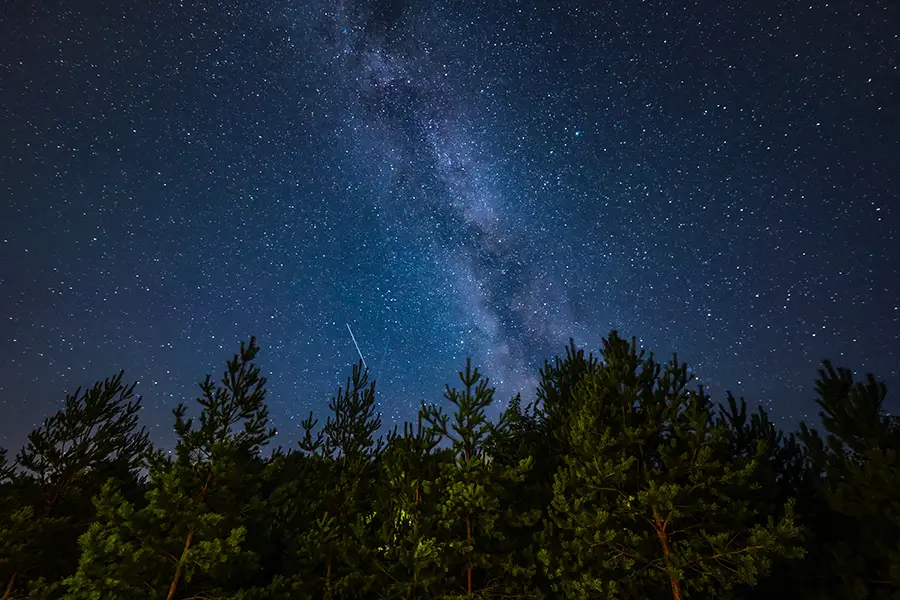
Long exposures
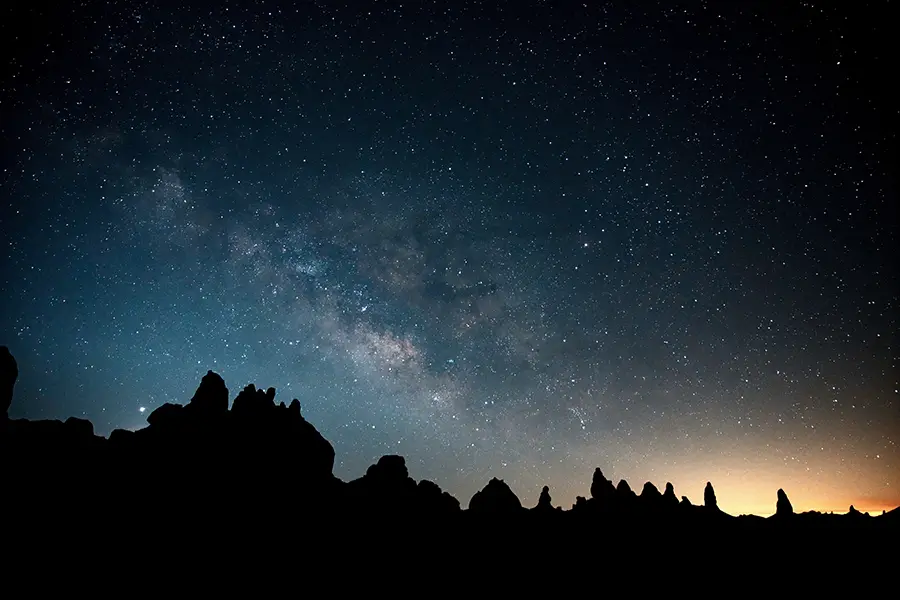
When using long exposure times, the camera sensor accumulates more heat, which can introduce noise into the image. This is particularly noticeable in astrophotography or night photography, where exposure times are often several seconds or even minutes long.
Image compression
Image file formats like JPEG use compression algorithms to reduce file size, which can inadvertently introduce graininess or compression artifacts into the image. Using RAW format captures more detail and dynamic range, enabling noise reduction in post-processing.
Camera sensor limitations
Each camera sensor has inherent limitations in capturing light accurately and reproducing colors, which can contribute to graininess. The quality and age of the camera sensor and the manufacturer’s noise reduction algorithms can impact the amount of graininess present in images.
By being aware of these factors and adjusting camera settings, shooting conditions, and post-processing techniques, photographers can minimize graininess and produce cleaner, higher-quality images.
How to Prevent Noise in Photography
To minimize graininess in your photographs, consider the following techniques:
Optimal Camera Settings
Selecting the appropriate camera settings is crucial for reducing graininess in your photos. Here are some tips:
- Lower ISO settings: Use the lowest possible ISO setting that still allows for proper exposure. Higher ISO settings can introduce more graininess in the image.
- Choose the right aperture: Using a larger aperture (smaller f-number) can help you capture more light, allowing you to use lower ISO settings.
- Faster shutter speed: A faster shutter speed can help minimize motion blur, which can contribute to graininess. However, faster shutter speeds require more light, so this may not always be an option in low-light situations.
Proper Lighting
Ensuring adequate lighting is essential in reducing graininess:
- Use natural light: Whenever possible, utilize natural light sources to illuminate your subject. This can help you achieve a cleaner, sharper image.
- Add artificial light: In low-light situations, introduce external light sources like flash or continuous lighting to supplement available light.
- Reflect and diffuse light: Use reflectors and diffusers to distribute light evenly and eliminate harsh shadows.
Stabilization Techniques
Utilize stabilization techniques to ensure sharp, noise-free images:
- Use a tripod: A sturdy tripod can help eliminate camera shake, resulting in sharper images with less graininess.
- Use image stabilization: Built-in image stabilization in some cameras and lenses reduces camera shake and improves image quality.
How ISO Affects Noise in Photography
ISO is a fundamental camera setting that affects the sensor’s sensitivity to light and plays a significant role in determining the amount of noise in your photographs. Understanding the relationship between ISO and graininess can help you make better decisions when setting up your camera to capture high-quality, noise-free images.
As you increase the ISO value, the camera sensor becomes more sensitive to light, allowing you to capture images in low-light situations without increasing the exposure time or using a larger aperture. However, this increased sensitivity comes at a cost: higher ISO settings amplify the signal from the sensor, which can also amplify any existing noise or random variations in the sensor’s readings.
When you use a low ISO setting, the sensor produces a cleaner signal with less noise, resulting in a higher-quality image with more detail and better color accuracy. However, using a low ISO setting requires more light, which means you may need to use a slower shutter speed or a larger aperture to achieve the correct exposure.
The relationship between ISO and Noise
- Lower ISO settings result in less noise and better image quality but require more light to achieve proper exposure.
- Higher ISO settings increase the sensor’s sensitivity to light, allowing for faster shutter speeds or smaller apertures in low-light situations but also introducing more graininess into the image.
The optimal ISO setting for minimizing noise in your images will depend on your camera’s specific conditions and capabilities. Modern cameras have advanced sensors and noise reduction algorithms that perform well at higher ISO settings. This enables photographers to capture relatively clean images even in challenging low-light situations. However, as a general rule, it’s always best to use the lowest possible ISO setting that still allows for proper exposure to minimize the graininess in your photographs.
Discover More
Noise Reduction in Post-processing
If you’re dealing with graininess in your photos, post-processing software can help you reduce it:
- Noise reduction tools: Most photo editing software has built-in noise reduction tools that can help reduce noise in your images. These tools typically allow you to adjust the strength and detail of the noise reduction applied.
- Selective noise reduction: Some editing software offers selective noise reduction, which allows you to target specific areas of the image for graininess reduction. This is particularly helpful when you want to preserve details in certain areas while minimizing graininess in others.
- Sharpening tools: While not a direct solution for graininess, sharpening tools can help improve the overall appearance of your image. However, be cautious to keep your photos a secret, as this can introduce additional artifacts.
- Third-party plugins: Several third-party plugins and software specifically focus on noise reduction. Some popular options include Topaz DeNoise AI, DxO PhotoLab, and Neat Image.

Reducing Noise in Adobe Photoshop and Adobe Lightroom
Adobe Photoshop and Adobe Lightroom are both powerful tools for photographers, and each offers features to help reduce noise in your images. Here’s how to use these tools in each software:
Adobe Photoshop
- Open the image in Photoshop.
- Make a duplicate of the background layer by right-clicking the layer and selecting “Duplicate Layer,” or use the keyboard shortcut “Ctrl+J” (Windows) or “Cmd+J” (Mac).
- Go to the “Filter” menu, hover over “Noise,” and select “Reduce Noise.”
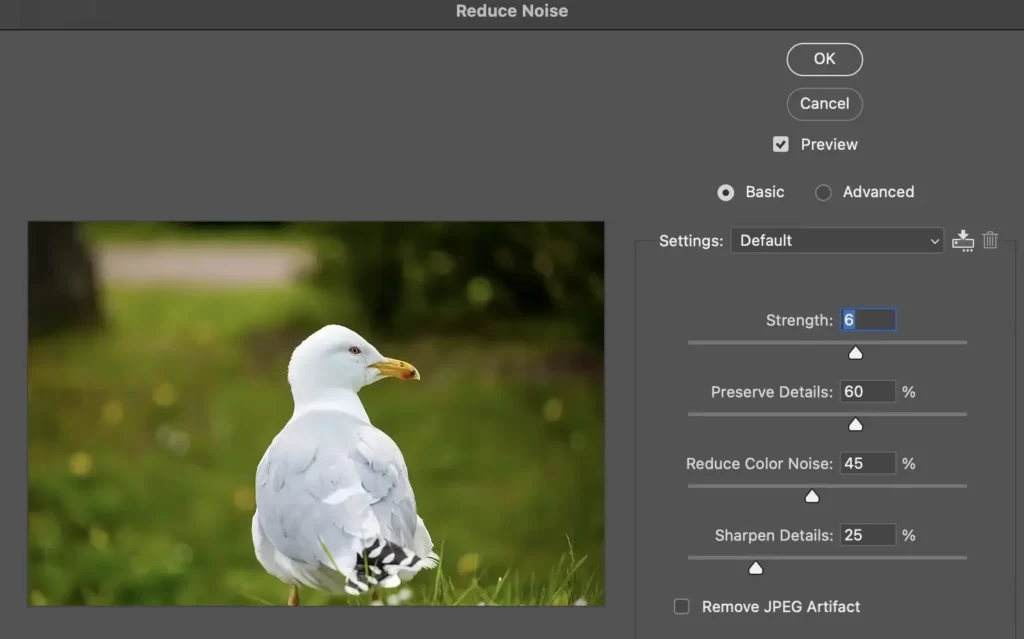
- In the “Reduce Noise” dialog box, you’ll see several sliders:
- “Strength”: Controls the overall strength of the noise reduction. Higher values will apply stronger noise reduction.
- “Preserve Details”: Adjusts the balance between noise reduction and detail preservation. Lower values will reduce noise at the expense of image detail.
- “Reduce Color Noise”: Reduces color artifacts and speckles in the image.
- “Sharpen Details”: This applies a slight sharpening effect to the image after noise reduction.
- Adjust the sliders to find the right balance between noise reduction and image detail. Use the preview window to see the effect of your adjustments.
- Click “OK” to apply the noise reduction.
- If necessary, use layer masks or the opacity slider to selectively apply the noise reduction to specific areas of the image.
- Save your image in your desired format.
Adobe Lightroom
- Import your image into Lightroom and switch to the “Develop” module.
- Locate the “Detail” panel on the right side of the workspace.
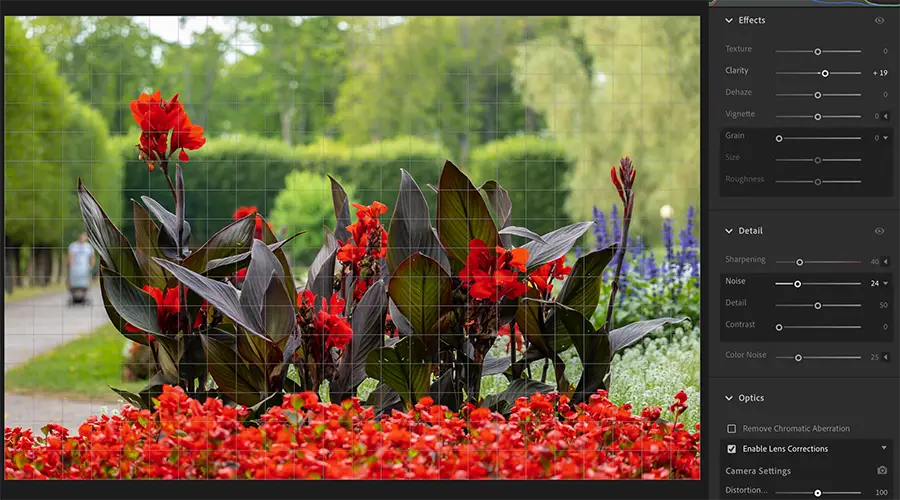
- Under the “Detail” panel, you’ll find two sets of sliders for noise reduction:
- “Luminance”: Controls the reduction of luminance noise, which appears as graininess or speckles in the image. Adjust the slider to find the right balance between noise reduction and detail preservation.
- “Color”: Reduces color noise, which appears as random color speckles in the image. Adjust the slider to find the right balance between color noise reduction and color detail preservation.
- Use the “Detail” and “Contrast” sliders under the “Luminance” and “Color” sections to fine-tune the noise reduction settings further. These sliders control the balance between noise reduction and detail preservation.
- You can apply noise reduction selectively using layer masks or opacity sliders.
- Make any other desired adjustments to your image in Lightroom.
- Export your image in your desired format.
With Adobe Photoshop and Lightroom’s noise reduction tools, reduce noise in images without losing significant details. Explore various settings to strike the right balance between preserving details and minimizing graininess in your photographs.
Conclusion
Noise in photography can significantly impact image quality, but with using the right techniques and tools, it can be minimized or even eliminated. You can capture cleaner, sharper images by understanding the factors that contribute to graininess and taking steps to prevent it through optimal camera settings, proper lighting, and stabilization techniques. Additionally, post-processing software and noise reduction tools can help you further reduce graininess and improve the overall quality of your photos. With these tips in mind, you’re on your way to producing stunning, noise-free images.
FAQs
To reduce noise in photography, use a combination of image capture and post-processing techniques. During image capture, utilize the lowest possible ISO setting that allows for proper exposure, select a larger aperture when possible, and stabilize your camera with a tripod or image stabilization features. Additionally, ensure adequate lighting by maximizing natural light, using artificial light sources, and employing reflectors or diffusers. Use noise reduction tools in photo editing software during post-processing. Be cautious with sharpening tools to enhance image quality and avoid introducing further artifacts.
While graininess is generally considered undesirable, there are instances where it can be used creatively. For example, adding a subtle grain to an image can give it a vintage or film-like appearance.
To avoid graininess in low-light situations, use a fast lens with a large aperture, shoot with a camera that performs well at high ISO settings, and consider using artificial light sources or a tripod to stabilize your shots.
AW format provides the highest level of detail and dynamic range when shooting, offering greater flexibility in post-processing to minimize graininess in comparison to compressed formats like JPEG.