

Mastering Histograms for Better Photography
Like many beginners in photography, I felt overwhelmed by the technical aspects and jargon when I started exploring this world. One term that kept popping up was “histogram.” At first, I dismissed it as just another specialized tool I didn’t need. But as I progressed and honed my skills, I soon realized that histograms are incredibly valuable for capturing better, well-balanced images. In this article, I’ll share my knowledge about histograms and help you master their usage for your photography.
- Mastering Histograms for Better Photography
- What is the Histogram?
- The Key Components of a Histogram
- Types of Histograms: A Quick Rundown
- How to Read a Histogram in Photography
- Enhancing Your Photography with Histograms
- Histogram and Exposure
- How to Recognize Common Problems Using Histograms
- Tips for Mastering Histogram Usage
- Histogram Panel in Adobe Photoshop and Lightroom
- End Note
- FAQs
What is the Histogram?
A histogram is a visual representation of the distribution of light and color within an image. Histograms provide photographers with a precise way to assess the exposure of a photograph, preventing the image from being too dark or too light. Think of it as a guide to achieving the perfect balance between shadows, mid-tones, and highlights in your shots. This graphical tool is indispensable for amateur and professional photographers, allowing for more informed decision-making when adjusting camera settings.
Histograms are the unsung heroes of photography, revealing the secrets of exposure and guiding us to capture the perfect balance of light and shadow.
Ansel Adams

The Key Components of a Histogram
Before diving into the nitty-gritty of histograms, it’s crucial to understand their basic components. A histogram consists of the following elements:
- Horizontal Axis (X-axis): This axis represents the range of brightness levels in your image, from pure black (0) on the left to pure white (255) on the right. The middle section corresponds to mid-tones or gray shades.
- Vertical Axis (Y-axis): The vertical axis indicates the number of pixels at each brightness level.
- Bars: The bars in the graph illustrate the distribution of brightness levels within your image. Taller bars indicate a higher concentration of pixels at that specific brightness level.
Types of Histograms: A Quick Rundown
There are three primary types of histograms that photographers should be familiar with:
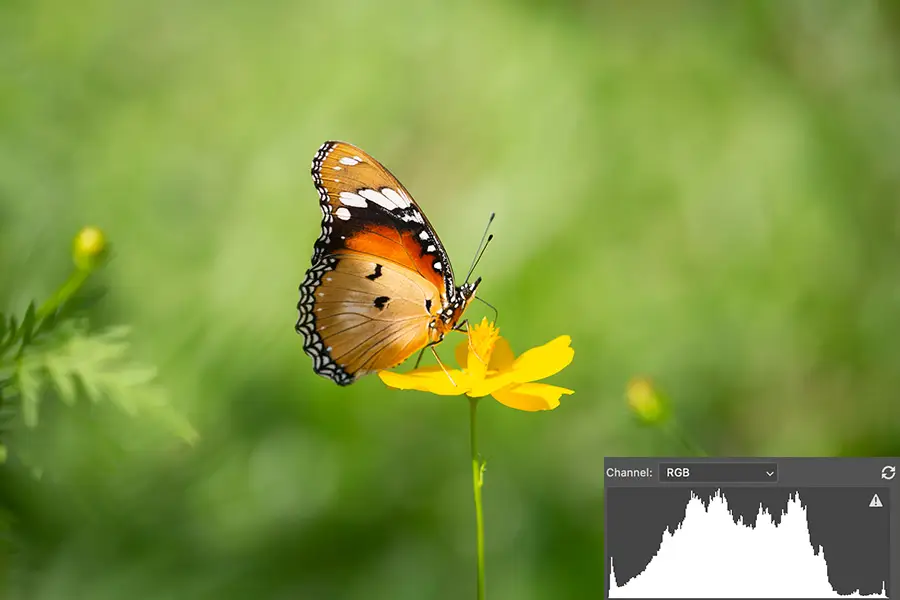
- Luminance Histogram: This type of histogram displays the overall brightness levels of an image without considering individual color channels. It’s a great tool for assessing the general exposure of a photograph.
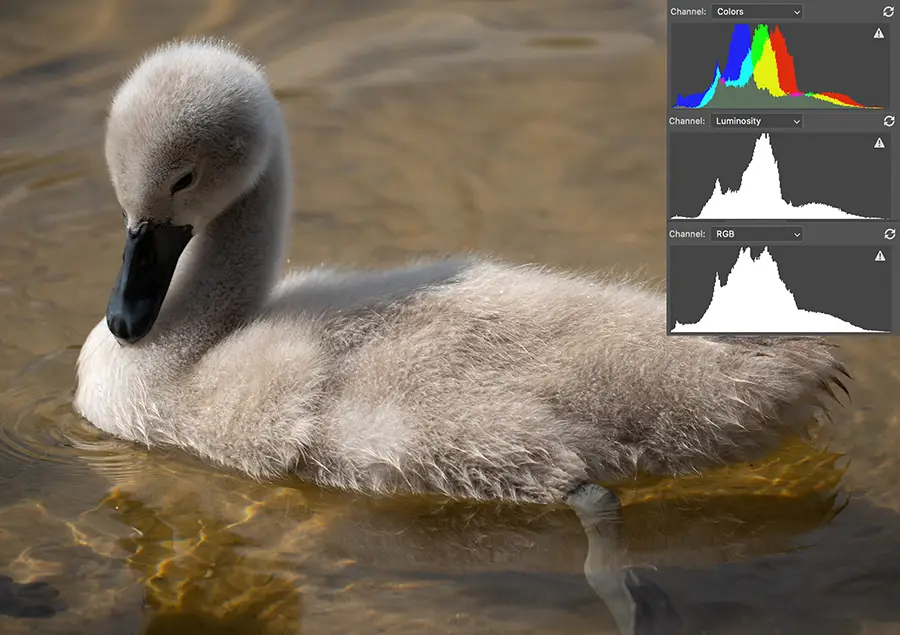
- RGB Histogram: This variant shows the distribution of brightness levels for each color channel (red, green, and blue) separately. It’s useful for evaluating color balance and saturation in your images.
- Color Histogram: A color histogram combines the information from the RGB histogram into a single graph, giving you a comprehensive view of color distribution in your image.
How to Read a Histogram in Photography
To read a histogram effectively, follow these steps:
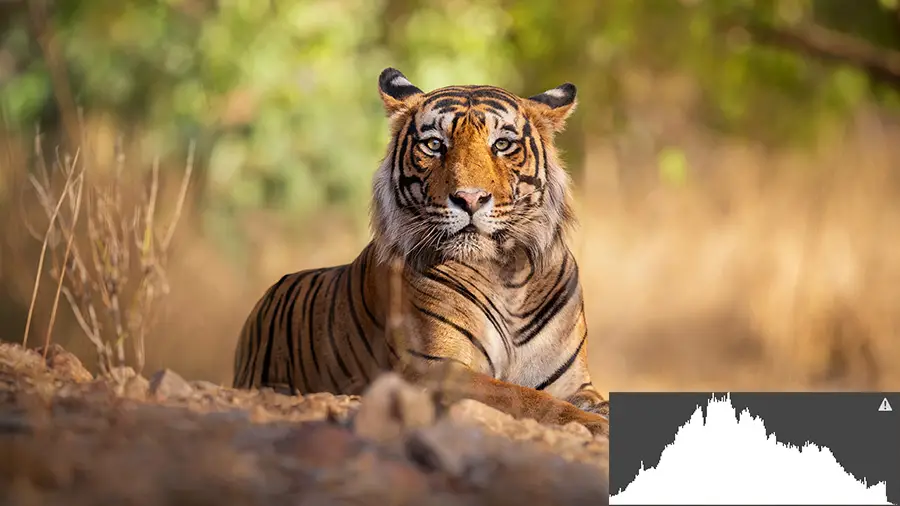
- Evaluate the Distribution: The overall distribution of the histogram gives you insight into the exposure of your image. The image is likely well-exposed if most data is concentrated in the center. If the distribution leans towards the left, it may be underexposed, and if it’s skewed to the right, it could be overexposed.
- Look for Clipped Shadows and Highlights: Clipping occurs when the histogram is pushed against either edge of the graph, causing a loss of detail in the darkest or brightest areas of the image. If you see clipping, consider adjusting your exposure settings to bring back the lost details.
- Identify Contrast and Dynamic Range: The width and shape of the histogram can help you understand your image’s contrast and dynamic range. A narrow histogram indicates low contrast, while a wide histogram suggests high contrast. Similarly, a histogram with data spread evenly across the graph represents a wide dynamic range.
- Examine the Color Channels: If you’re using a color or RGB histogram, observe the distribution of the individual color channels. Imbalances between the channels could indicate issues with color saturation, white balance, or color casts.
Enhancing Your Photography with Histograms
Now that you know how to read histograms, it’s time to put that knowledge into practice. Here are some tips for using histograms to improve your photography:
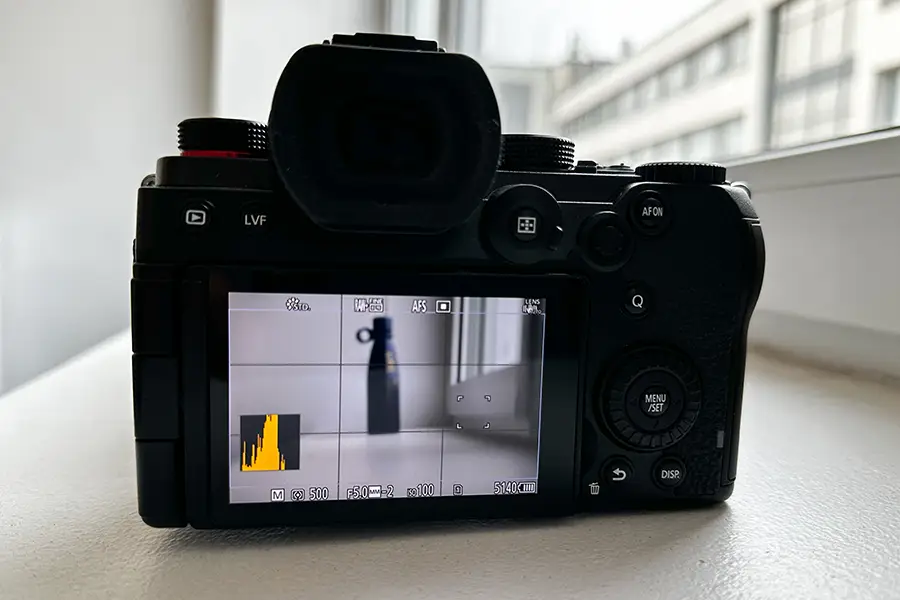
- Use Live View: Many cameras offer a live histogram feature, allowing you to see the histogram in real time as you compose your shot. This is an excellent way to adjust your exposure settings before capturing the image.
- Shoot in RAW: Shooting in the RAW format gives you more flexibility regarding post-processing. You can significantly adjust exposure and color balance with a RAW file without sacrificing image quality.
- Bracket Your Shots: Consider bracketing your exposures when shooting high-contrast scenes or in challenging lighting conditions. By capturing multiple images with different exposure settings, you can choose the best exposure in post-processing or combine them to create an HDR image.
Histogram and Exposure
A histogram is an indispensable tool for assessing exposure in your images. It displays the distribution of brightness levels, enabling you to evaluate whether your image is well-exposed or if adjustments are necessary.
When analyzing a histogram, look for the following:
- The overall shape and distribution of the histogram to determine the exposure balance and dynamic range.
- Clipping on either end indicates a loss of detail in the shadows or highlights.
- The histogram’s width can help you gauge the contrast in your image.
By carefully studying histograms and adjusting your camera settings, you can achieve well-exposed images that capture a scene’s full range of tonal values.
More to Love: Find Your Next Favorite Guide
How to Recognize Common Problems Using Histograms
Histograms can help you recognize and address common problems in photography, such as poor exposure, low contrast, and color balance issues. By examining the histogram, you can make informed decisions to correct these problems and achieve better image results. Here’s how to identify common issues using histograms:

Poor Exposure
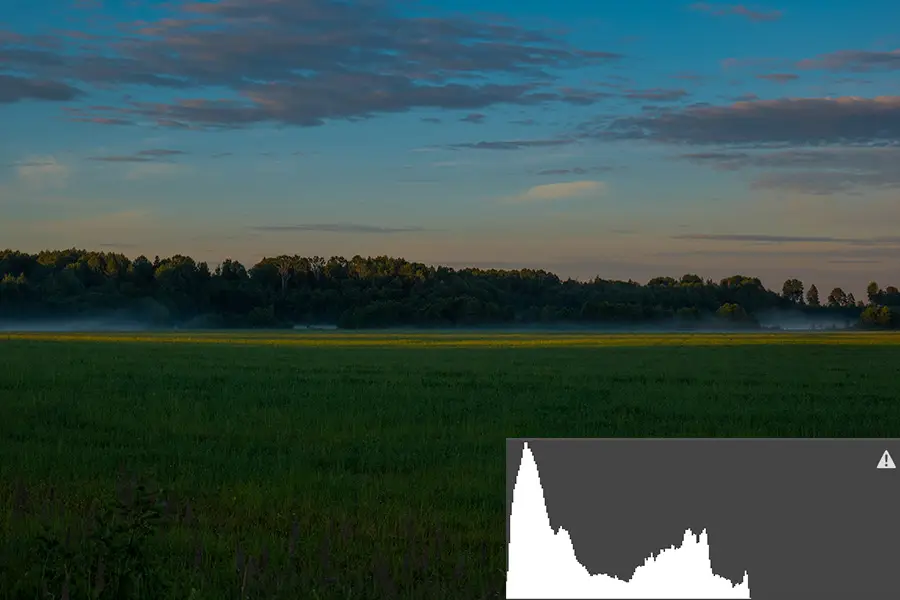
Underexposure: If your image is underexposed, the histogram will be skewed towards the left, indicating a predominance of dark tones. You’ll see a concentration of data in the shadow areas, with little or no information in the highlights.
Overexposure: An overexposed image will display a histogram skewed towards the right, with a concentration of data in the highlighted areas and little or no information in the shadows.
Solution: Adjust your exposure settings (aperture, shutter speed, or ISO) to achieve a more balanced histogram. You can also utilize exposure compensation or bracketing to capture multiple images with different exposures, then select the best one or combine them during post-processing.
Low Contrast
A low-contrast image will have a narrow histogram and be concentrated around the mid-tones, with little or no data in the shadows and highlights. This can result in a flat, dull-looking image.
Solution: Adjust your camera settings to increase or enhance contrast during post-processing using tools like curves, levels, or contrast sliders. Beware of overdoing it, as excessive contrast can cause a loss of detail in shadows and highlights.
Color Balance Issues
If your image has color balance issues or casts, the color channels in an RGB or color histogram will not align well. You may notice one color channel dominating the others or separating the channels.
Solution: Adjust your camera’s white balance settings to achieve a more natural color balance or correct color balance issues during post-processing using tools like white balance sliders, color balance adjustments, or hue/saturation sliders.
Clipped Shadows and Highlights
Clipping occurs when the histogram is pushed against either edge of the graph, causing a loss of detail in the darkest or brightest areas of the image.
Solution: To avoid clipping, adjust your exposure settings or use techniques like exposure bracketing to capture a wider dynamic range. In post-processing, you can also recover some details in RAW files using shadow/highlight recovery tools, but be aware that extreme adjustments can introduce noise or artifacts.
By recognizing these common problems using histograms and applying the appropriate solutions, you can significantly improve the quality of your images and achieve more satisfying results in your photography.
Tips for Mastering Histogram Usage
- Consistent Practice: Regularly review and analyze histograms for your images to better understand how different exposure settings impact the histogram’s appearance.
- Combine Tools and Techniques: Use histograms in conjunction with other exposure tools, such as blinkies, exposure compensation, and spot metering, to achieve well-exposed images.
- Emphasize Artistic Vision: Histograms are a valuable tool but don’t solely rely on them. Consider your creative intent and use histograms to help achieve your desired aesthetic.

Histogram Panel in Adobe Photoshop and Lightroom
Both Photoshop and Lightroom feature histogram panels that provide valuable information about your images’ exposure, contrast, and color balance. These panels allow you to make informed decisions during post-processing and help you achieve your desired results.
Adobe Photoshop
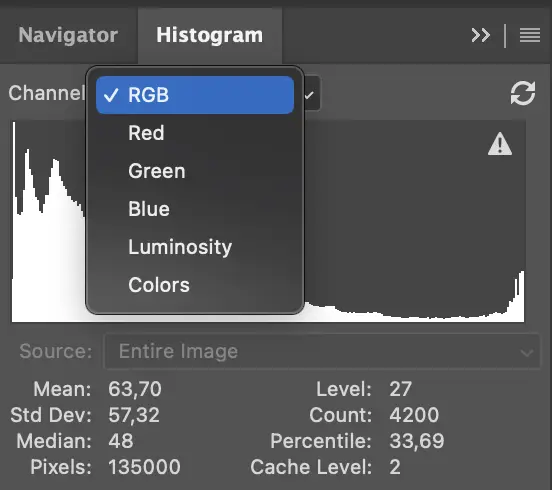
You can access the histogram panel in Photoshop by navigating to Window > Histogram. The histogram panel in Photoshop displays the distribution of brightness levels for the entire image or a specific area within it. You can choose between different channel views, including Luminosity, RGB, and individual color channels (Red, Green, or Blue).
Key features of the histogram panel in Photoshop:
- Channel Selection: Choose between different channel views to analyze your image’s overall brightness, color balance, and color saturation.
- Statistics: View the Mean, Median, Standard Deviation, and other statistical information for a more in-depth understanding of your image’s tonal distribution.
- Caching: Photoshop’s histogram panel updates in real time as you make adjustments to your image, allowing you to see the impact of your edits on the tonal distribution.

Adobe Lightroom
In Lightroom, the histogram panel is at the top of the Develop module. Like Photoshop, Lightroom’s histogram panel displays the distribution of brightness levels in your image. It allows you to choose between different channel views, including RGB and individual color channels (Red, Green, or Blue).
Key features of the histogram panel in Lightroom:
- Interactive Editing: The histogram panel in Lightroom is interactive, allowing you to click and drag directly on the histogram to adjust exposure, highlights, shadows, whites, and blacks.
- Channel Overlays: Lightroom displays color channel overlays on the histogram for visualizing individual color channel distribution.
- Clipping Indicators: Lightroom’s histogram panel includes clipping indicators for shadows and highlights. Clicking these indicators will reveal the clipped areas in your image, helping you make exposure adjustments accordingly.
In summary, the histogram panels in both Photoshop and Lightroom serve as essential tools for analyzing and adjusting the exposure, contrast, and color balance of your images during post-processing. Using these panels effectively lets you fine-tune your photographs and achieve your desired results.
End Note
I have acquired valuable knowledge and skills by using histograms in my photography journey, and I am grateful for it. Mastering histograms has significantly improved my understanding of exposure, contrast, and color balance and has allowed me to capture better, more visually appealing images.
I hope that this article has shed light on the importance of histograms and provided you with the data and guidance you need to make the most of this indispensable tool. As you continue exploring the world of photography, don’t be afraid to dive deep into histograms and embrace their potential to enhance your creative vision. Remember, practice makes perfect, and with time, you will find histograms invaluable in your photographic journey. Good luck, and happy shooting!
FAQs
Yes, histograms can be helpful during post-processing, especially if you shoot in RAW format. However, it’s essential to note that significant exposure adjustments can negatively impact image quality.
Your camera’s histogram is generated based on the JPEG preview, while your editing software may display a histogram based on the RAW file. This can lead to minor discrepancies between the two histograms.
Yes, histograms are still useful when shooting in black and white. In this case, a luminance histogram will be most relevant, as it focuses on the overall brightness levels in your image.
Yes, histograms are beneficial in various lighting conditions, including low light and harsh sunlight. In low-light situations, histograms can help you identify underexposure and adjust your camera settings to capture more detail in the shadows. In harsh sunlight, histograms can guide you in achieving a balanced exposure, avoiding blown-out highlights or blocked-up shadows. By understanding how to read and interpret histograms, you can make informed decisions about your camera settings and capture well-exposed images regardless of the lighting conditions.
Become a Photographer
Are you passionate about photography and ready to turn your hobby into a fulfilling career? Look no further than Become a Photographer, the ultimate guide to mastering the art of photography.Become a Photographer